Overview
Admin users can add new parking accounts under the Add Customer main menu tab. If a valid email address is entered the customer will receive an email notification to complete the account or the admin user can complete the account from the Pending Requests list.
Add a New Account
To add a new account, follow the steps below.
1. Log into the Flash A/R Portal.
2. At the top right, click Manage Account.
2. On the left menu, click Add Customer.
3. Enter the new customer’s Email Address or chose Email Address Not Known.
4. (Optional) Enter the First and Last Name, Phone Number, Street Address, Apt/Unit Number, City, State, Zip Code, Company Name, and Optional Notes.
5. In the Parking location dropdown, choose the parking location.
6. (Optional) Enter the End Date and uncheck the End Date Unknown box.
7. Click Save and Email Customer.

There are a few options to complete the account setup:
- Option 1: If the account contains an email address, the system will send the customer an email notification to complete the billing setup. Once the customer completes the account requirements, the system will send the Admin an email notification.
- Option 2: The Admin can proceed to the following page and add the parker's information and set up the billing method.
Add parkers to account
The system will automatically prompt to add a parker after a user selects the Save and Email Customer button. The entered customer name will auto-complete the Parker Name field.
1. Check the auto-completed Parker Name field for accuracy. Edit the name if the account holder is not a listed parker.
2. Select the Rate Code in the dropdown. Linking a rate code to the parker automatically builds the recurring invoice for the account. Rates Codes are preprogrammed monthly rates under the Settings tab.
3. Use the calendar button to select the Start Date. The Start Date affects when invoicing should begin for the parker.
4. (Optional) Uncheck No End Date and select End Date. The parker start date can differ from the Start date that applied to the entire account.
5. (Optional) Enter a Department.
6. (Optional) Set an Access Level. Access Levels translate to Profile Restrictions.
7. Set the PARCS Credential.
- Pass #: Radio-frequency identification (RFID) prox card
- Format ex: 183:123456
- Mobile #: Bluetooth low energy (BLE) Access
- Requires FlashParking or ParkWhiz app download
- BLE-only accounts require RFID data. The RFID data builds the backup barcode available in the BLE mobile app. Fake RFID data can be entered.
- Tag: Automatic vehicle identification (AVI)
- AVI tag number
- Plate/Make/Model/State: License plate recognition (LPR):
- Enter Plate with no spaces or dashes.
- PARCS Card: RFID prox card from inventory list
- Use this field if the admin employed an inventory list to load the PARCS card data.
8. Set additional settings by selecting Additional Fields.
- Pass Status
- ON: Enables all PARCS credentials / Access Granted
- OFF: Disables all PARCS credentials / Access Denied
- Passback Rule
- OFF: Passback disabled (default)
- ON: Allows passback
- Account Setting: This must be selected for each parker to allow the passback rule to be managed from the Advanced tab for the Account.
- Report Group: Report Groups are a capacity limiting data point that can be applied to an individual parker or the entire parking account (all linked parkers).
- Pool Name: Pools are a capacity limiting data point that can be applied to an individual parker or the entire parking account (all linked parkers).
- Employee ID: Employee IDs are used for Reporting purposes only. Late Fee on Kiosk Charge the monthly parker a late fee for a parking area violation.
9. (Optional) Enter valet customer credentials. Enter all valet barcode data with the following syntax: Monthly Prefix + barcode number. ex: ABC000001
- Barcode: Valet customer card barcode information
- Vehicle Key Barcode: Valet keytag barcode information
- Vehicle Barcode: Valet window decal barcode information
10. (Optional) Enter the assigned Vehicle Key Hook.
11. Click Add Parker then click Close.
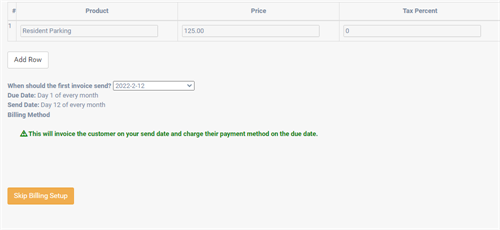
Confirm Recurring Invoice
To confirm the recurring invoice, follow the steps below.
1. Click Continue to proceed to Billing Setup.
2. The invoice will automatically list the added Rate Codes applied to the Parker's profile.
3. Review Recurring Invoice Products and select the Invoice start date.
4. Click Save.
5. Click Add Another customer or I'm done adding customers.
The Programmed Rate Codes automatically populate the price field.
Accept a Pending Request
After a user saves a customer account, the account requires approval to activate. The portal will automatically direct to the Pending Request section or follow the steps below to navigate to Pending Requests.
1. Log into the Flash A/R Portal and select Manage Account at the top right.
2. Select Accounts on the left menu and the desired parking account in the Pending Requests section.
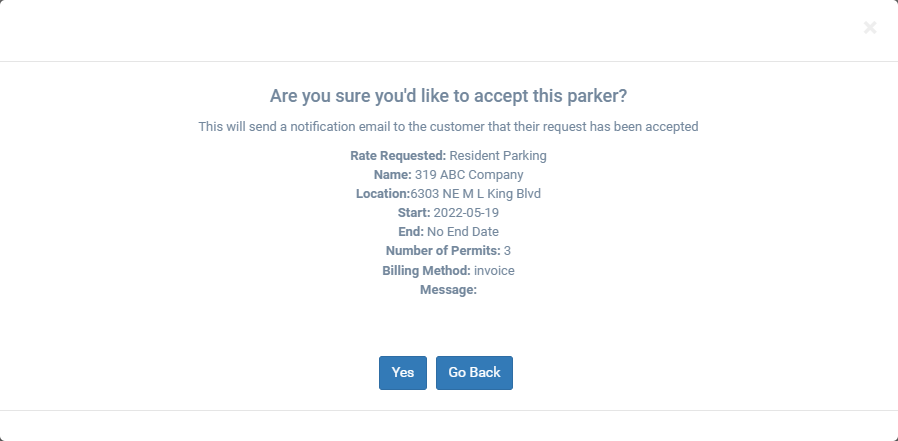
3. Click Accept to activate the account and review account information and click Yes.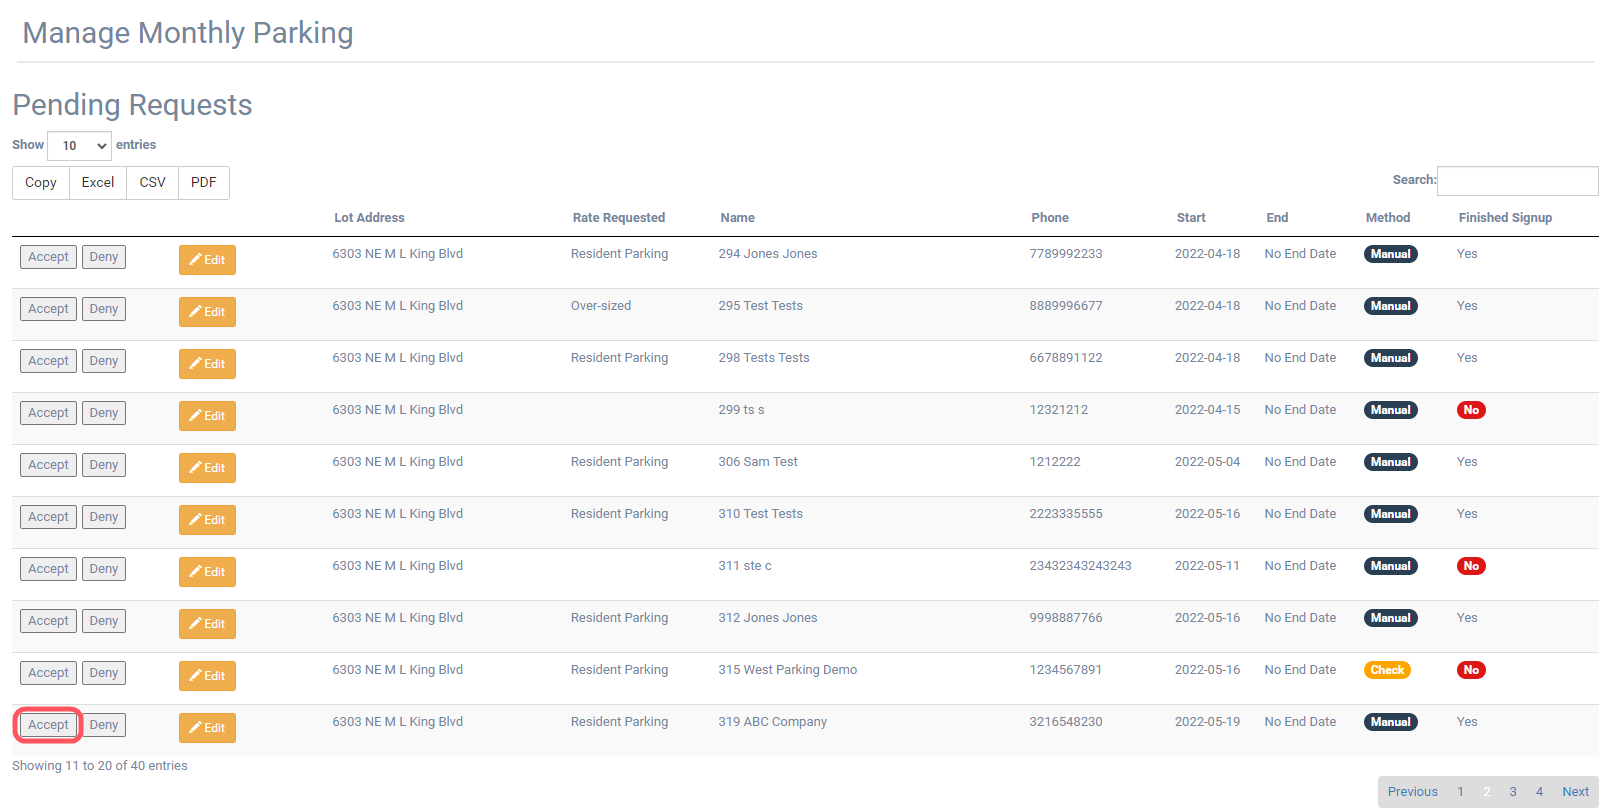
4. Click Edit to review and confirm the Parker information is correct and click Next.
5. Click either:
- Yes: To set up a One-Time Invoice to charge the parker for a prorated amount, set up fee, or deposit fee.
- Skip or Not Now: To bypass and proceed to Recurring Invoice confirmation.
7. Click Yes to Review recurring invoice or Not Now to bypass and push the account to an Active status. The account can now be found under the Active Accounts section and the monthly account entry visible in the PARCS integrated system.
Was this article helpful?
That’s Great!
Thank you for your feedback
Sorry! We couldn't be helpful
Thank you for your feedback
Feedback sent
We appreciate your effort and will try to fix the article