CREATE FLAT RATES
Admin users can create and manage prices in the Flash Admin portal. The price creation for Admin users is limited to flat rates and discounted rates based on previously programmed rates. A flat rate is a one time fee with no time-duration logic.
Contact Flash Support for any hourly, pre pay, or recurring rate scheduling requests. How to Create a Flat Rate
1. Go to https://portal.flashvalet.com and log in to the Admin Portal.
2. Select the Locations tab on the left menu and choose the Location.
3. Select the Ticket Types tab on the top menu and choose the Transient ticket type.
4. Scroll to the bottom of the page and select Add New under Add Ticket Type Price.

5. Enter a Price Name and the fee amount.
- The image below is an example of a flat rate.

6. Select Save.
- Once Saved the rate amount is greyed out and can't be edited.
Set a Default Rate
When the "Selected" setting is checked, it will automatically assign that price as the default rate when issuing a ticket for a Flash PARCS or Flash Valet system upon arrival.
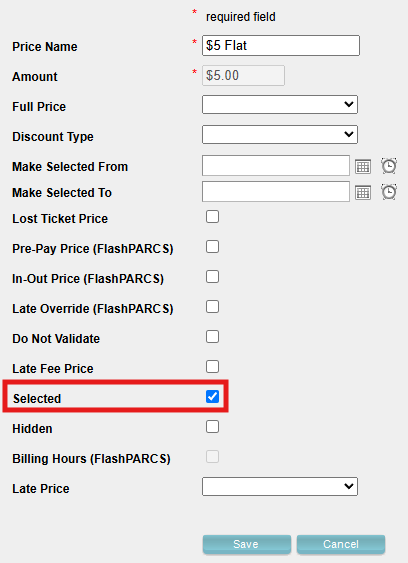

Once Saved, the Selected setting will be greyed out. The rate can only be changed by Saving another price as "Selected", this is to ensure the system always has a saved default rate.

Prices marked as Selected/Default cannot be deleted. To delete a price, first set a different price as the Default.
Schedule a Rate
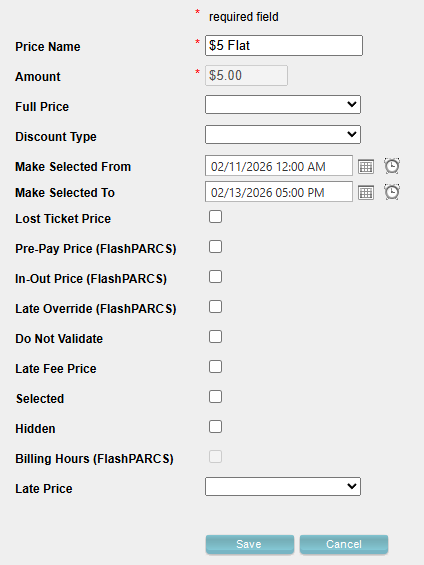
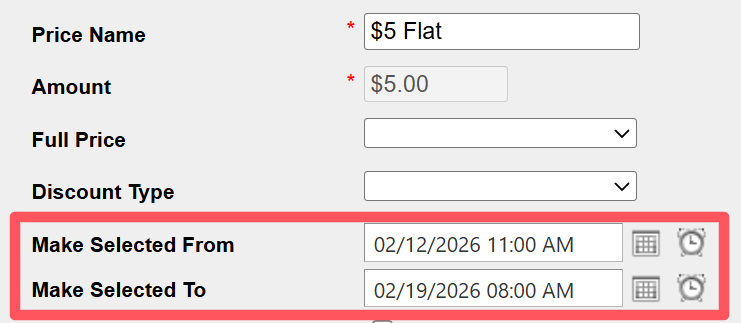
Using the Make Selected From / Make Selected To fields automatically schedules when the price will be active default rate. Typically used for one-time events. The system will automatically set this price as the default rate. The system will automatically switch back to the previously selected rate after the schedule ends.
NOTE: These fields are not to be used for Validations as this will override the default rate and issue the validation to all transient tickets pulled during the time.

To set an expiration date on a validation, see Expiry Days settings here.
Set Up
- Log in to the Admin Portal.
- Select the Location.
- Navigate to the Ticket Type tab, or the Logical Zone tab (for locations with Logical Zones).
- Scroll down to the Linked Flash PARCS Prices section.
- Click the price you want to schedule and ensure it is not selected (✔). If it is selected, the Make Selected From/To fields will be grayed out. Or add a new price.
- Set the desired date and time for the price schedule.
- Click Save to apply the changes.
Enable the “Make Automatic” Setting
For this feature to work, Make Automatic must be enabled either at the Ticket Type level or at the Logical Zone level (for locations with Logical Zones only).
Keep in mind:
- Make Automatic is disabled whenever a rate is manually selected as the default. To reactivate the Make Selected From/To fields, you must re-enable Make Automatic after manually selecting a rate.
- If Make Automatic is enabled during the valid time, the rate change will not take effect. Make Automatic must be enabled before the valid time begins.
- Once enabled, the Make Automatic setting will appear greyed out.

Was this article helpful?
That’s Great!
Thank you for your feedback
Sorry! We couldn't be helpful
Thank you for your feedback
Feedback sent
We appreciate your effort and will try to fix the article